
How do I download files in a Remote Desktop Session over SSH
A quick blog post to show how I move files between a remote desktop connected machine and my local linux host via a Windows virtual machine and a SOCKS proxy.
Introduction
Hoenstly, the title of this post should be “How do I download files in a Remote Desktop Session when connected via a SOCKS proxy from a Windows Remote Desktop client running as a VirtualBox virtual machine on a Ubuntu host”, but let’s keep that for the rest of the blogpost.
It is common knowledge that the Windows tsclient and Windows RDP Shared Local Resources can be used to move files between a remote Windows Desktop Server connected via RDP from a Windows client via the \\tsclient network machine. Nothing changes in terms of how the files are transferred even when you tunnel your RDP connection through SSH using SOCKS. This post is about a setup that I use to access Windows Servers using Remote Desktop, especially when the remote target is IP whitelisted and my Windows client is a Virtualbox virtual machine on a host linux system.
The setup is somewhat akin to a digital version of a Rube Goldberg’s machine given the connectivity, but is not uncommon in the real world when performing penetration tests or when connecting to a Windows Server accessible only to a few IP addresses.
The Setup
The following is an example of a setup that I often encounter at work or otherwise when setting up and testing my machines on the cloud. The key players in the setup are
- The remote Windows Server target with Remote Desktop enabled and visible only to
linuxjumpbox.public- Internet resolvable hostname:winrdpserver.public - A linux machine which acts as the jump box to access
winrdpserver.public- Internet resolvable hostname:linuxjumpbox.public - My Windows 10 VirtualBox Virtual Machine - HostOnly Adapter (no Internet connectivity):
192.168.56.100 - My local Ubuntu host - HostOnly (
192.168.56.1) and wireless/ethernet Internet access
Visually this looks as shown below:

Rolling it together
Step 1 - Connect to the Jumpbox using SSH with a Local Port forward
The first step would be to create a SSH tunnel to winrdpserver.public using an SSH connection to linuxjumpbox.public from my Ubuntu localhost. The command to do that would be
ssh -i private-key sshuser@linuxjumpbox.public -L 192.168.56.1:3389:winrdpserver.public:3389
You can also avoid mentioning the key in the command by running ssh-add so that the key is available in the SSH cache to the SSH client. You can also create an SSH config file to run this command as shown below
Host rdptunnel
    Hostname linuxjumpbox.public
    IdentityFile /path/to/private/key/for/ssh
    User sshuser
    LocalForward winrdpserver.public:3389
This opens TCP port 3389 on my Ubuntu host machine on the VirtualBox HostOnly Adapter with IP 192.168.56.1. Any data sent to this IP and port combination will be forwarded to winrdpserver.public over the SSH tunnel.
Step 2 - Setting up a data collector folder on the Windows client
Next we will create a folder on the Ubuntu local host and mount it as a Network drive on the Windows 10 Virtual machine so that data exchange between the Windows 10 VM (the RDP client) and the host machine (where I do my analysis of the data) becomes straightforward.
As the first step, I create a folder on my Ubuntu host where the data will be collected for analysis. Let’s assume the folder path is /data/random/remote-rdp-data/
Once this is done, we can mount this folder on the Windows 10 VM using vboxmanage or the Virtualbox settings for the virtual machine. To do this via command line, I use the following commands on my host machine
- Get the UUID of the Windows 10 VM -
vboxmanage list vms - Make the local data folder available to the Windows VM as a shared folder -
vboxmanage sharedfolder add {VM-UUID} --name remote-rdp-data --hostpath /data/random/remote-rdp-data/ --automount - Start the VM -
vboxmanage startvm {VM-UUID}
Once the VM has booted, login into the VM and run the following commands so that the data folder that is now available to the VM is mapped as a network drive. This drive will be exposed to the remote RDP server when we connect to it.
- Open a command prompt window and run
net use Z: \\vboxsvr\remote-rdp-data. Use a different drive letter ifZ:is taken. Go toThis PCor as most of us still call it,My Computerand verify that the drive was created and mapped to the folder on the host machine. - This can also be performed via the
Map a Network Drivefeature inThis PC
Step 3 - Connecting to the SSH tunnel to Access RDP remotely
Now that we have a local drive created which is mapped to a folder on the host machine, and the SSH tunnel is alive, we can go ahead and connect to the target RDP server using the SSH tunnel.
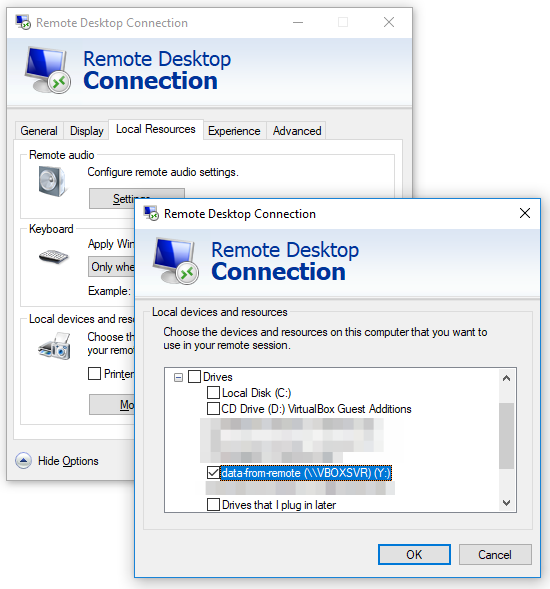
An important (and perhaps the most significant setting change given the title of this post) setting is to enable drive sharing between the RDP client and server.
- Go to start Run and type
mstsc - In the
Remote Desktop Connectiondialog, click onShow Optionsand go toLocal Resources - Under
Local devices and resources, click on theMorebutton - Expand
Drivesand select the drive that was created for this exercise - Connect to the RDP session
Step 4 - Where is the drive shared on the Windows Server?
Once the RDP session is estabilished, open This PC on the remote Windows Server. The drive should be visible and accessible here. Any file copied to this location now will reach the host Ubuntu machine via the SSH tunnel and the RDP connection from the Windows 10 VM.
Some things I have learnt in the past with this setup
- Do not clutter the local folder with data. Once a file is copied, move it to a different location for your analysis. This is because if there are a lot of files in the folder, tsclient and Windows Explorer take a lot of time reading the filenames and file properties so that they can be displayed in the Explorer window. This can appear as if the folder is frozen.
- File copy over RDP is slow. Hence it is recommended to zip multiple files into a single file and then initiate the copy instead of copying multiple files.
- I have had mixed results in terms of file copy speeds when I reduce the overall Experience of the RDP connection. This is available under
Show Options>Experience. Play withSatelliteandLow-speed broadband - You can use this folder just like any other conventional network shared folder and as such, you can move data between the systems (to and fro).
Final thoughts
Just a whackish way of gettings files out over an RDP connection and directly to your local host machine if like me you use a Windows VM for RDP. Personally, I prefer using Windows RDP client as it gives me greater control over the screen size and allows sharing of clipboard and resources without any glitches. Your mileage may vary with other tools. I’m not aware of a single tool that allows you to set this up end to end, but aliasing most of the commands covered here does help speed up the overall process. This is my go to method of transferring files safely and securely to my local host machine, especially when the target Windows machine does not have Internet access and/or is accessible only to a fixed IP.
That’s all in this post! Till the next one, Happy Hacking!